LinkWithin is a very popular widget that shows the related posts with a thumbnail and although it is not a new gadget among bloggers, many avoid using it for its lack of customization. So, this tutorial will show you how to add LinkWithin on a Blogger blog and how to customize it.

This is what we will do with this gadget:
 Although it provides the option to choose Blogger as a platform, we will select Other in order to implement the code directly into our template and then modify it. Select the number of posts (stories) according to the width of the content area - if the width of the posts container is narrower, then it is recommended to display fewer related posts.
By clicking on the "Get widget!" button, we'll be given the code that we need use it. It should look something like this:
Cick anywhere inside the code area and press the CTRL + F keys to search for the following line:
By doing so you already have the LinkWithin gadget on your blog and the result will be like this:
 Note: If you would like to display it only in post pages, you can enclose the code using a Blogger conditional tag.

If you don't want round thumbnails, remove the code in red. In green you can see the parts which can be customized - there you can apply more styles or change the background color, text size, etc.
After you've made the changes, click on the "Save Template" button. So this is how we can customize the LinkWithin related posts widget. Enjoy!
This is what we will do with this gadget:
- Change the location of the gadget;
- Remove the LinkWithin link;
- Change the "You might also like" title with any other text;
- Add rounded borders to images;
- Remove the border that separates posts;
- Add a background color;
- Change the background color on mouse over;
- Change the post titles color and font
Adding the LinkWithin gadget to Blogger
First of all we need to install the LinkWithin gadget. For this, we have to go to the LinkWithin homepage and type in the required information:By clicking on the "Get widget!" button, we'll be given the code that we need use it. It should look something like this:
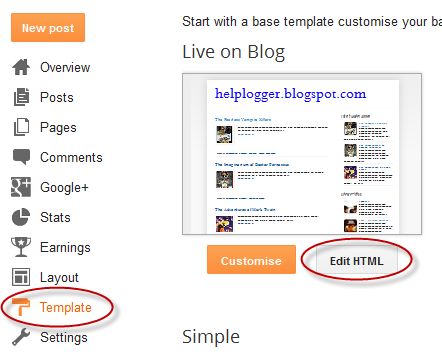
<script>That's the basic code we need to copy. Now login into your Blogger account > select your blog to where you want to add the LinkWithin gadget and go to "Template" > click on the "Edit HTML" button:
var linkwithin_site_id = XXXXXXX;
</script>
<script src="http://www.linkwithin.com/widget.js"></script>
<a href="http://www.linkwithin.com/"><img src="http://www.linkwithin.com/pixel.png" alt="Related Posts Plugin for WordPress, Blogger..." style="border: 0" /></a>
Cick anywhere inside the code area and press the CTRL + F keys to search for the following line:
<div class='post-footer'>Just above this line, paste the LinkWithin code.
By doing so you already have the LinkWithin gadget on your blog and the result will be like this:
Change the LinkWithin gadget location
By default, this widget will always appear right at the end of your posts. In the LinkWithin FAQ page we can find solutions on how to fix this - simply add the code below where we want the widget to appear:<div class='linkwithin_div'/>This will make the gadget to display right where we added the code. Even if we don't want to change the gadget location, this line is required so that we can customize it later.
Replacing the "You might also like" LinkWithin text
By default, the LinkWithin gadget shows the "You might also like" title but we can change the text to anything we want. Just add the line below in blue within the LinkWithin code:<div class='linkwithin_div'/>And change the text - in this case, it will show "Related posts" instead of "You may also like these stories".
<script>
var linkwithin_site_id = XXXXXXX;
</script>
<script>linkwithin_text='Related Posts:'</script>
<script src="http://www.linkwithin.com/widget.js"></script>
<a href="http://www.linkwithin.com/"><img src="http://www.linkwithin.com/pixel.png" alt="Related Posts Plugin for WordPress, Blogger..." style="border: 0" /></a>
Changing the LinkWithin background color and thumbnails style
Within the template's code, search for the ]]></b:skin> tag and just above it, add the following CSS styling:.linkwithin_div {After adding this CSS, the LinkWithin gadget will look like this:
background: #EEEEEE; /* Background color for the related posts container */
padding: 0 10px;
border-top: 1px solid #DBDBDB; /* Top border for the related posts container */
border-bottom: 1px solid #DBDBDB; /* Bottom border for the related posts container */
}
.linkwithin_text {
font-family: Cambria,Georgia,sans-serif;
font-size:18px; /* Size for the related posts title */
color:#898989; /* Color for the related posts title */
}
a#linkwithin_logolink_0, a#linkwithin_logolink_1, a#linkwithin_logolink_2, a#linkwithin_logolink_3, a#linkwithin_logolink_4, a#linkwithin_logolink_5, a#linkwithin_logolink_6, a#linkwithin_logolink_7, a#linkwithin_logolink_8, a#linkwithin_logolink_9, a#linkwithin_logolink_10, a#linkwithin_logolink_11, a#linkwithin_logolink_12, a#linkwithin_logolink_13, a#linkwithin_logolink_14, a#linkwithin_logolink_15, a#linkwithin_logolink_16, a#linkwithin_logolink_17, a#linkwithin_logolink_18, a#linkwithin_logolink_19, a#linkwithin_logolink_20 {
display:none;
}
.linkwithin_posts {
width: 500px !important; /* Width for the related posts container */
}
.linkwithin_posts a {
border: 0 !important;
padding-right: 10px !important;
}
.linkwithin_posts a:hover {
background: #F5F5F5 !important; /* Background color on mouseover */
}
.linkwithin_img_0 {
background: #F5F5F5;
border: 1px solid #C1C1C1;
padding: 2px !important;
transition:all .2s linear;
-o-transition:all .5s linear;
-moz-transition:all .2s linear;
-webkit-transition:all .2s linear;
}
.linkwithin_img_0:hover {
background: #ffffff;
padding: 2px !important;
opacity:.6;
filter:alpha(opacity=60)
}
.linkwithin_img_0 div, div.linkwithin_img_0,
.linkwithin_img_1 div, div.linkwithin_img_1,
.linkwithin_img_2 div, div.linkwithin_img_2,
.linkwithin_img_3 div, div.linkwithin_img_3,
.linkwithin_img_4 div, div.linkwithin_img_4,
.linkwithin_img_5 div, div.linkwithin_img_5,
.linkwithin_img_6 div, div.linkwithin_img_6,
.linkwithin_img_7 div, div.linkwithin_img_7,
.linkwithin_img_8 div, div.linkwithin_img_8,
.linkwithin_img_9 div, div.linkwithin_img_9,
.linkwithin_img_10 div, div.linkwithin_img_10,
.linkwithin_img_11 div, div.linkwithin_img_11,
.linkwithin_img_12 div, div.linkwithin_img_12,
.linkwithin_img_13 div, div.linkwithin_img_13,
.linkwithin_img_14 div, div.linkwithin_img_14,
.linkwithin_img_15 div, div.linkwithin_img_15,
.linkwithin_img_16 div, div.linkwithin_img_16,
.linkwithin_img_17 div, div.linkwithin_img_17,
.linkwithin_img_18 div, div.linkwithin_img_18,
.linkwithin_img_19 div, div.linkwithin_img_19,
.linkwithin_img_20 div, div.linkwithin_img_20 {
-webkit-border-radius: 100px;
-moz-border-radius: 100px;
border-radius: 100px;
}
.linkwithin_title {
color: #242424 !important; /* Color for titles */
font-family: Cambria,Georgia,sans-serif;
font-size: 12px !important; /* Font size of posts titles */
line-height: 24px !important;
text-align:center;
text-decoration: none;
}
.linkwithin_title:hover {
color: #000 !important; /* Color of posts titles on mouseover */
}
If you don't want round thumbnails, remove the code in red. In green you can see the parts which can be customized - there you can apply more styles or change the background color, text size, etc.
After you've made the changes, click on the "Save Template" button. So this is how we can customize the LinkWithin related posts widget. Enjoy!
WOW,
ReplyDeleteThis is really a awesome post. thank you so much for this useful tips and tricks :)
can you help me - How to show full Blog post title on related post?. I am looking for a nice tips about it. please help me :)
I love your tutorial its very easy to follow along with and I really want it to work on my blog but I must have some sort of conflicting tag or something preventing it from working. The only way I can get the linkwithin to display on my blog is by using it as a widget. When I insert the code into the template, the linkwithin does not show at all. Any suggestions on what I might look for and change?
ReplyDeleteThank you so much for this post - I've been looking for something like this for a while! Just a few tweaking questions: 1) how can I centre-align the related posts title, 2) for some reason the border-top and border-bottom for the related posts widget aren't showing, 3) is there any way to get rid of the borders on the circles? Thank you!
ReplyDeleteI love the post, it is so thorough and explicit, the only issue I have is not being able to find the code:
ReplyDeletediv class='post footer'
I've looked on two of my blogs HTML already and can't find it anywhere, is there another code I could be looking for or am I just blind? Thank you for your help, I look forward to your response.
this worked like a charm. thank you! but i'm having a problem with changing the font size of the posts' title? no matter how little or big the px size..it doesnt change. is there anything i'm missing?
ReplyDeleteI have uninstalled this Linkwithin as it is was displaying in home page. Now i cannot able to install any of this widgets n relate , out brain etc to my site. I could not able to figure out the problem.
ReplyDeleteMy blog URL: http://www.lincyscookart.com/
u the bos!!
ReplyDeleteThank you, it's amazing
ReplyDeleteIt doesn't work. I have tried countless different kinds of code for a related post link. I have done exactly everything that everyone's instructions have said. With the linkwithin gadget.. It's just blank. The only thing shown is the text and the linked in link. Could there be something in my code that is preventing any and all related posts code from working?
ReplyDeletePlease add the LinkWithin script below the second (or third, if it still doesn't work) <data:post.body/>
DeleteOr you could try this widget from here
Thanks for visiting!
It wasn't working for me either. I added the script after the second , it still didn't work. Then had another go adding it after the 3rd one and it worked. Thank you for taking the time to reply to comments!
DeleteThought this tutorial was great,just what I have been looking for. I found it easy to understand.
ReplyDeleteBut I came across a problem. The first part went beautifully, I wasn't interested in changing the location or title of the gadget,but I did want to change the background and thumbnail style.
The only part of the code I could find that was similar to the part you showed "< b:skin >..."
I thought I would give it a go,but it came out in code and was positioned above my blog heading! Wooops.
Any ideas why I cant find the piece of code you have shown? Do I have the wrong type of template?
Hi Michelle,
DeleteYou can add the CSS styling without going to the HTML of your template. Just go to "Template" > click on the "Customize" button > select the "Advanced" tab > go to the "Add CSS" section and paste the code that you needed to add above ]]></b:skin> in the empty box. You can visit this tutorial for more info.
I would recommend to add this code snippet as well, as it might overlap with the posts footer:
.linkwithin_outer {
max-height: 200px;
}
I hope it will work now. Thanks for visiting!
Thankyou very much. It works for me when using this option! Thanks!! :)
DeleteThank you so much,It worked perfectly.
ReplyDeleteYou make it all so easy to understand.
I have tried a number of other sites and left with a massive brain ache. After following your instructions I leave with success and a massive smile!
Thank-you for this tutorial! Your website is so helpful. I'm trying to change the font for the titles of the related posts, but it doesn't seem to be working. I'm new at coding and I'm not sure where I have gone wrong. Here is the section I have altered:
ReplyDelete.linkwithin_title {
color: #666666 !important; /* Color for titles */
font-family: Garamond, Baskerville, “Baskerville Old Face”, “Hoefler Text”, “Times New Roman”, serif;
font-size: 12px !important; /* Font size of posts titles */
line-height: 12px !important;
text-align:center;
text-decoration: none;
}
Thanks for your help!
there is only one problem. i used this code as instructed by LinkWithin ie paste before */body* and also tried using a HTML widget. the thing is that the related posts appear in the main page as well as the post page.
ReplyDeletei dont want it on the main page at all.
the technique you mentioned here ie pasting above *div class='post-footer'* doesnt work for me.
can you tell me of a method to remove/hide related posts from my main page? I read your article about hiding widgets but that doesnt help. thanks...
heres my site if you want to see what i am talkinig about techunraveller.blogspot.com
ummm okay dude it worked!!sorry i said it didnt...it seems had made a mistake....my bad...never worked on html before so got confused :P
ReplyDeletethank you so much!
Marvellous!... Marvellous!... You don't know how long I'm affecting by this. Now you've solved my problems! Thank you very much!
ReplyDeletemy sincere thanks to you ! see my blog http://enticegrub.blogspot.in/ thank you somuch
ReplyDeleteWow! thank you so much for the useful advice! I've been trying for ages to add linkwithin and it hadnt been working but I tried this and it actually worked perfectly, so happy with the result :D
ReplyDeletewww.violetdaffodils.blogspot.co.uk
xx
I've been trying to add You might also like but with no luck and came across this post today so thought I'd try your way. Unfortunately I cannot find div class='post-footer' anywhere in my template. Do you have any suggestions of where else I can put this code? Many thanks.
ReplyDeleteThankyou so much, this has been really helpful. However when I edit the CSS code and change the text to the font I use, although the title of the gadget changes, the captions of the thumbnails do not. Is there anything I might be doing wrong?
ReplyDeleteHi Sophie,
DeleteYou will need to add the !important declaration to your font family, like this:
font-family: Century Gothic,sans-serif !important;
See if it works this way. Thanks for visiting!
Thank You, worked perfectly!! Great step by step tutorials.
ReplyDeleteThanks!!!
ReplyDeleteI installed linkwithin to my wordpress site. However, I just noticed that after posting a new post, no thumbnail appeared at the bottom of the other posts for that post? Does it take a long time for that to appear or did I install it incorrectly. Thanks so much!!!
ReplyDeleteHow can I centralise the linkwithin widget directly under my posts - any help gratefully received
ReplyDeleteThank's a lot man.. It realy work. All the best...
ReplyDelete